

Check thermal clip on zero by comparing a confirmed day-scope group with a group fired through the fitted clip-on, using the same ammunition, distance, aiming point and support. If the group centre shifts, check the mounting and the manufacturer’s alignment procedure before making corrections, then remove and refit the clip-on to verify that the result repeats.
- Thermal clip on zero requires a live-fire comparison against your confirmed day-scope zero.
- Check mounting repeatability before correcting a shifted group centre.
- Use the manufacturer’s clip-on alignment procedure; do not assume every thermal device adjusts the same way.
- GoingDark thermal optics suit Australian hunters choosing equipment around their existing setup.
Why this matters
A clear thermal image does not prove that your rifle still places shots where the day-scope reticle points. Image quality, mechanical fit and point of impact are separate checks. Confirm the complete mounted setup before taking it hunting.
For a 2026 purchase, start with the thermal clip-on buying guide for Australian hunters. Choose a device and adapter intended for your configuration, rather than treating any thermal optic with a mounting accessory as a clip-on.
The useful result is not simply a shot near the aiming mark. You want a repeatable group centre, a secure attachment and a setup that returns to the same result after removal and refitting.
How do you check zero after fitting a thermal clip-on?
Use a controlled comparison at a suitable shooting range with a safe backstop. Follow the firearm, day-scope, adapter and thermal device manuals, and unload the firearm before fitting, removing or inspecting equipment.
Keep the test simple. Changing ammunition, support, distance and scope settings together makes a shift harder to diagnose.
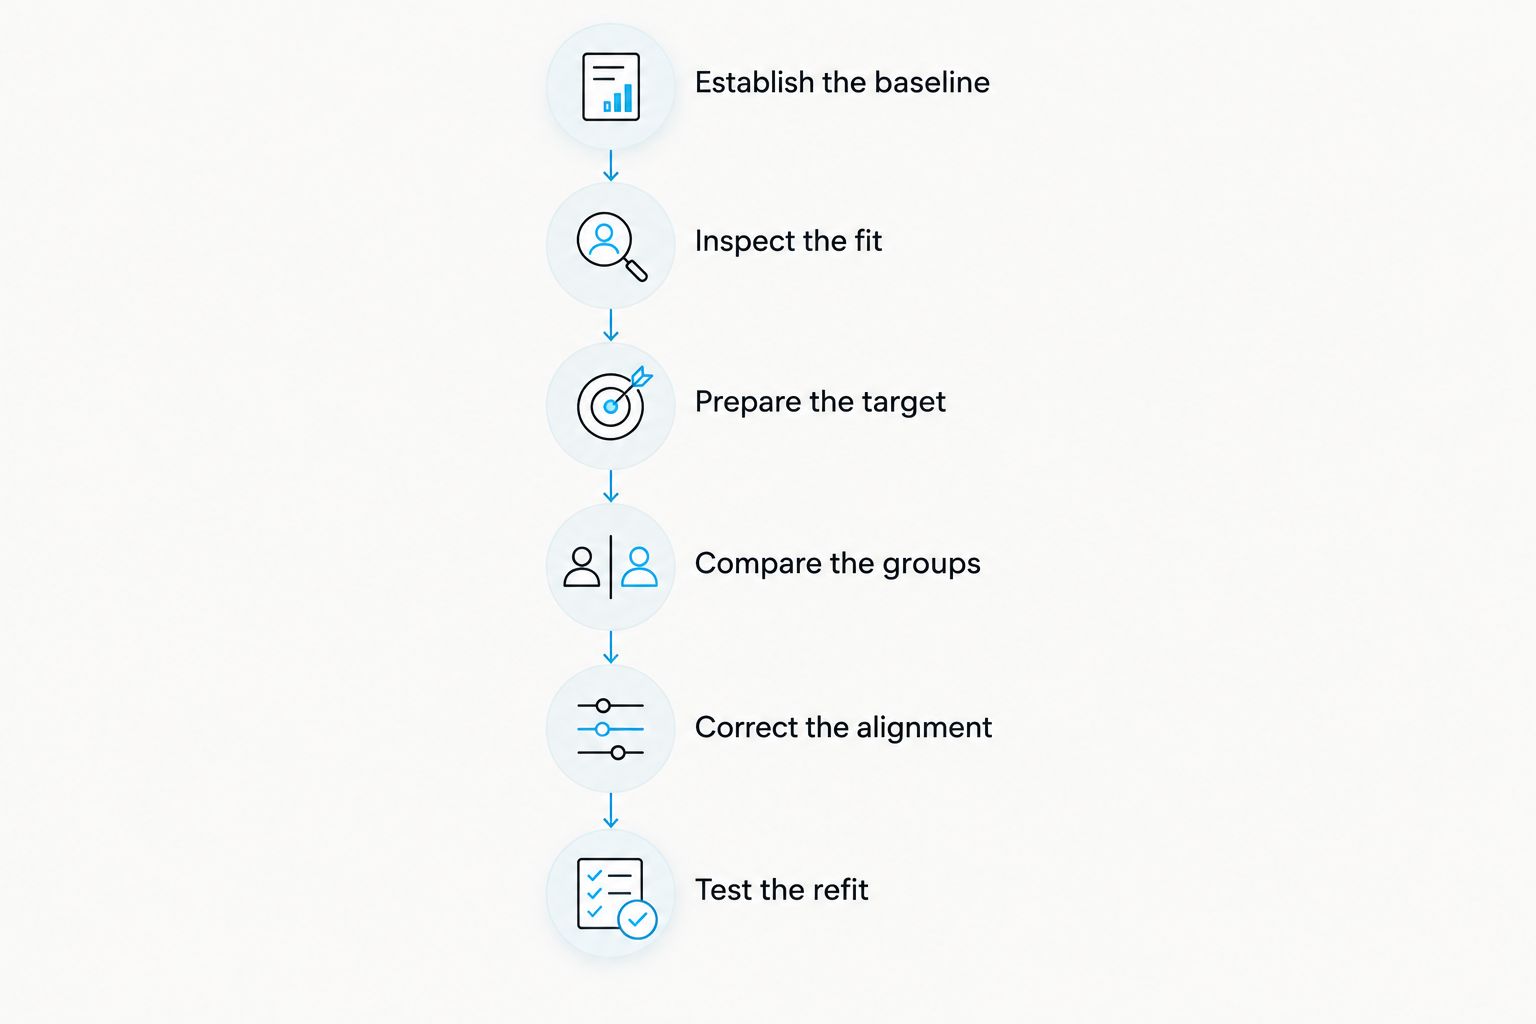
Establish the baseline
Confirm the day scope without the clip-on before testing anything else. Use the ammunition you intend to use with the finished setup, a stable support and a clearly defined aiming mark. Record the actual distance rather than relying on an estimated distance.
Fire a group that lets you assess your rifle’s normal dispersion. Mark its centre and keep the target; one isolated impact cannot show whether a later difference is an attachment issue or ordinary variation within the group.
If the day-scope group is inconsistent, stop the clip-on comparison. Check the underlying rifle, ammunition, mounts and shooting conditions first. A variable baseline gives you no dependable reference for correcting the thermal setup.
Your 2026 zero record should identify the rifle, ammunition, day scope and test distance. Include scope magnification and any relevant parallax setting so you can reproduce the comparison later.
Inspect the fit
With the firearm unloaded, inspect the adapter and attachment surfaces. Check that the components are the correct type and size for the exact equipment, that they seat as the manufacturer specifies, and that nothing prevents full engagement.
Do not compensate for a loose or incorrectly fitted adapter with electronic alignment. An adjustment changes the image relationship; it does not repair a mechanical attachment that moves between shots or refits.
For buyers checking a HIKMICRO Thunder configuration, GoingDark lists the Rusan QR one-piece adapter for HIKMICRO Thunder. Confirm the exact device, adapter variant and day-scope dimensions before choosing it. The listing name alone does not establish compatibility with your particular combination.
Use the specified tightening method and torque where the manufacturer provides them. Do not substitute a generic torque figure, add packing material or force a clamp closed to make an uncertain fit work.
Prepare the target
Use an aiming feature that you can locate consistently through both viewing configurations. A printed mark that looks sharp through the day scope is not automatically a distinct thermal reference. Check the target through the thermal device before starting the comparison.
GoingDark’s HIKMICRO zero targets for thermal scopes are a relevant accessory to check for this task. Follow the target instructions rather than assuming a particular activation method, temperature or useful duration.
The thermal feature needs a defined centre. A large, indistinct patch makes it difficult to tell whether you aimed at the same place each time, especially when the apparent shape changes as the target’s thermal contrast changes.
Keep the target position and distance fixed throughout the comparison. If you replace the aiming feature, establish its location carefully so the replacement does not become an unrecorded change in the test.
Compare the groups
Fit the clip-on according to its manual and select the operating mode intended for that configuration. Set the day-scope magnification within the manufacturer’s supported range. Focus the thermal image using the controls specified for the device.
Shoot the comparison group with the same ammunition, aiming location and support used for the baseline. Keep your shooting position consistent and assess the centre of the group, not just its nearest impact to the aiming mark.
Record the horizontal and vertical difference between group centres. Note the group spread as well: a shifted but compact group and a much larger group are different problems, even when both contain an impact near the original zero.
Do not assume a visually centred display proves alignment. The practical check is whether the assembled setup produces the intended point of impact. A tidy sight picture is useful, but it is not a substitute for that comparison.
Correct the alignment
If the difference is repeatable, use the manufacturer’s procedure for checking or correcting clip-on alignment. Some devices provide image-position controls for this purpose; the available controls, movement direction and saving process depend on the model.
Leave the confirmed day-scope zero unchanged while diagnosing a clip-on-specific shift. Moving the day-scope turrets first removes your reference and can leave the rifle incorrectly zeroed when you take the clip-on off.
Do not copy an adjustment value from another device. Confirm the exact menu, operating mode and distance assumptions in your manual, then save the setting using the specified process. Recheck the result with a fresh group rather than treating the menu change as proof.
If the manual provides no user alignment procedure, or the correction does not remain consistent, stop making changes. Have the fit and equipment assessed instead of building further adjustments around an unresolved problem.
Test the refit
Unload the firearm, remove the clip-on and inspect the attachment. Refit it using the same seating and locking procedure, then repeat the live-fire comparison. This checks the assembled system’s return-to-zero behaviour rather than just its result from one installation.
A group that changes position after refitting points to a repeatability problem that needs investigation. Check seating, attachment security and the manufacturer’s operating instructions before accepting the setup for hunting.
After the comparison, remove the clip-on and confirm that the day-scope baseline remains intact. That final check separates a clip-on issue from a change affecting the rifle or day scope itself.
Keep the targets with your 2026 equipment record. Record the adapter, relevant saved settings and fitting procedure alongside the group results. Those details make a later check meaningful after a component change or suspected knock.
What do the comparison results mean?
Use the pattern across the groups to decide what to investigate. Do not chase individual impacts with repeated adjustments. A correction is useful only when the underlying result repeats.
| Test result | What it establishes | Benefit | Limitation and next move |
|---|---|---|---|
| Day-scope baseline | Reference point of impact without the clip-on | Best for separating existing zero problems from attachment problems | Does not prove clip-on alignment; complete the fitted comparison |
| Fitted clip-on group | Point of impact with the thermal assembly installed | Best for checking the complete shooting configuration | One installation does not establish refitting repeatability |
| Removal and refit group | Behaviour after reattaching the clip-on | Best for checking return to zero | A changed group centre needs investigation before further correction |
| Final day-scope group | Whether the original baseline remains intact | Best for identifying a wider setup change | Does not resolve an inconsistent clip-on attachment |
Why thermal clip-on zero results vary
The same rifle can produce different comparison results when the test conditions or assembly change. Check these factors before deciding that an electronic correction is the answer:
- Adapter seating: Debris, incomplete engagement or a different fitted position changes the mechanical setup. Follow the specified seating procedure every time.
- Attachment security: Movement at the adapter or another mounting interface prevents a dependable comparison. Inspect the complete assembly, not just the clip-on body.
- Aiming-point definition: A vague thermal feature gives you a less precise aiming reference. Use a target with a centre you can identify consistently.
- Scope configuration: Magnification, focus and relevant parallax settings affect how you use the sight picture. Stay within the device’s instructions and record the settings.
- Baseline consistency: Ammunition changes, unstable support and inconsistent shooting obscure the difference you are trying to measure. Keep those variables controlled.
For a 2026 setup, retain this information with the saved alignment settings. A menu value without the equipment and test conditions is an incomplete record.
How do you measure a point-of-impact shift?
Measure the difference between the baseline group centre and the fitted group centre in both directions. Record the displacement and the test distance together. A measurement without its distance cannot describe an angular shift.
For reference, 1 milliradian corresponds to 10 cm at 100 m. 1 minute of angle corresponds to approximately 29.1 mm at 100 m. These are angular relationships, not promised accuracy figures or universal clip-on adjustment increments.
Use your device manual to determine how its alignment controls relate to movement on the target. A display-position value is not automatically a milliradian or minute-of-angle value. Do not translate a measured shift into button presses using another model’s instructions.
Also distinguish displacement from group spread. A group centre can remain close to the baseline while the impacts spread more widely. That result still needs investigation because an average position alone does not establish a dependable setup.
Should you adjust the day scope or the clip-on?
Use the clip-on manufacturer’s alignment procedure for a repeatable clip-on-specific shift, while preserving the confirmed day-scope zero. First rule out a mounting problem and verify that the device supports the intended configuration. If the day-scope baseline has also moved, investigate the underlying setup before adjusting either optic.
Does removing a thermal clip-on preserve zero?
Removal and refitting require a repeatability check; the attachment method alone is not proof. Compare group centres after refitting and confirm the day-scope baseline again. If the result changes between installations, resolve the attachment or equipment issue before relying on the setup.
Can you check thermal clip-on zero without firing?
You can inspect fit, operating mode, image focus and saved settings without firing, with the firearm unloaded. Those checks do not establish live-fire point of impact. A clear image or a bore-alignment check does not replace the fitted group comparison.
FAQ
What is the best way to check thermal clip on zero?
Compare a confirmed day-scope group with a fitted clip-on group under the same test conditions. Check the group centres, then remove and refit the clip-on to test repeatability.
Should I move my day-scope turrets after fitting a thermal clip-on?
Preserve the confirmed day-scope zero while diagnosing a clip-on-specific shift. Check the fit first, then follow the thermal device’s approved alignment procedure.
Do I need a thermal target to check a clip-on?
You need an aiming feature that is clearly defined through the thermal device. Check that you can locate the same aiming point consistently in both the baseline and fitted configurations.
Does a sharp thermal picture mean the clip-on is zeroed?
A sharp thermal picture does not prove zero. Image focus and live-fire point of impact are separate checks.
Can I use the same alignment settings on a different rifle?
Do not assume alignment settings transfer to a different rifle and day-scope combination. Follow the manufacturer’s setup instructions and verify the new assembled configuration with live fire.
What should I do if zero changes every time I refit the clip-on?
Stop making electronic corrections and investigate attachment repeatability. Check seating and locking against the manufacturer’s instructions, then have the equipment assessed if the problem persists.
Does a thermal detection distance tell me where to check zero?
A thermal detection distance does not set your zero-check distance or establish identification distance. Use a suitable test distance for your rifle setup and follow the equipment instructions.
One last thing
Prove the refit, not just the first fitting. A thermal clip-on setup that works once has not yet demonstrated what happens after you pack it away and attach it again.
Before your next 2026 hunt, compare the refitted setup against the recorded baseline. If you change the day scope, adapter or another relevant component, treat the assembly as a changed setup and verify it again. Keep detection, identification and confirmed point of impact separate in your buying and shooting decisions.
GoingDark thermal optics buying advice starts with matching the equipment to the hunter’s actual setup. For clip-on use, that means checking the intended configuration and attachment before choosing on image specifications alone.
Share:
How do you check a thermal clip-on's recoil rating?
How much magnification can you use with a thermal clip-on?